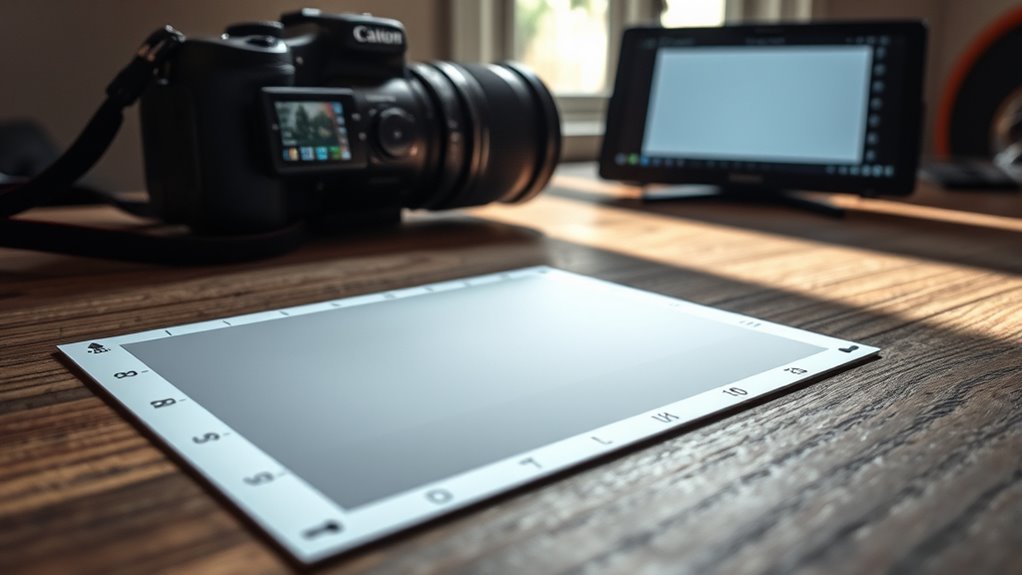
To calibrate white balance, start by setting your camera to manual mode and use a gray card as a neutral reference. Take a picture of the card in the lighting you’re working with, then adjust your white balance setting until the gray appears truly neutral. This guarantees your photos keep accurate, natural colors across various environments. By following these steps, you’ll improve your images’ realism and color accuracy—continue to explore for more expert tips.
Key Takeaways
- Use a gray or neutral-colored card to calibrate your camera’s white balance for accurate colors.
- Adjust manual white balance settings based on current lighting conditions for precise results.
- Understand the lighting source’s color temperature to set proper white balance.
- Take test shots under different lighting to fine-tune your white balance calibration.
- Regularly recalibrate in changing environments to maintain consistent, true-to-life colors.
Have you ever noticed that photos taken under different lighting conditions sometimes look unnatural or washed out? That’s often due to how your camera’s sensor interprets colors based on the lighting environment. Sensor color, or how your camera perceives and processes color information, can vary markedly depending on the lighting conditions. When you switch from sunlight to indoor lighting or fluorescent bulbs, your camera’s automatic white balance might struggle to keep colors accurate, resulting in images that look off. This is where white balance calibration comes into play—a vital step in ensuring your photos maintain true-to-life colors, regardless of the lighting.
Your camera’s sensor is designed to detect and interpret colors, but it relies heavily on the lighting conditions to do so precisely. Different light sources emit varying color temperatures, which influence how the sensor perceives color. For instance, daylight tends to be cooler with a bluish hue, while incandescent bulbs emit warmer, yellowish tones. Without proper white balance calibration, the camera might interpret these lighting cues incorrectly, making whites appear yellowish or bluish, and skewing other colors in the scene. When you don’t adjust for these variations, your photos can lose their natural look, making objects appear unreal or overly saturated.
To get the most accurate colors, you need to calibrate your white balance based on the lighting conditions. Many cameras have automatic white balance settings, but these aren’t always perfect, especially in mixed or tricky lighting environments. Manual calibration allows you to set a custom white balance or use a gray card to calibrate your camera precisely. When you do this, you’re essentially telling your camera, “This is what neutral gray looks like under these lighting conditions,” enabling it to better interpret colors accurately. This process helps your camera compensate for the sensor color’s response to the specific lighting environment, ensuring that whites stay white and colors look natural.

NothingProjector Motorized ALR Screen for Ultra Short Throw Projector, 95% Ambient Light Rejecting, 100 inch, Floor Rising, 4K/8K UHD, Active 3D, Anti Daylight, Electric Retractable Automatic NothPJ
✔ Adjustable Height, Zero Installation – Effortlessly adjust the screen to any height with a single press of...
As an affiliate, we earn on qualifying purchases.
Frequently Asked Questions
How Often Should I Recalibrate My Camera’s White Balance?
You should recalibrate your camera’s white balance whenever you notice color inaccuracies, sensor drift, or change in lighting conditions. Typically, calibration frequency depends on how often you shoot in different environments or if your camera experiences temperature shifts. Regular recalibration guarantees consistent color accuracy, especially if you notice subtle shifts over time. Aim to recalibrate every few months or after significant camera updates for ideal results.
Can White Balance Calibration Improve Video Quality?
Absolutely, calibrating your white balance can turn your dull videos into cinematic masterpieces—who knew? By fine-tuning color temperature and tint adjustment, you guarantee colors stay true, avoiding that weird bluish or orange glow. It’s like giving your footage a fresh coat of paint. So, yes, white balance calibration boosts video quality, making everything look natural and professional, saving you from post-production color correction nightmares.
What Equipment Is Needed for Professional White Balance Calibration?
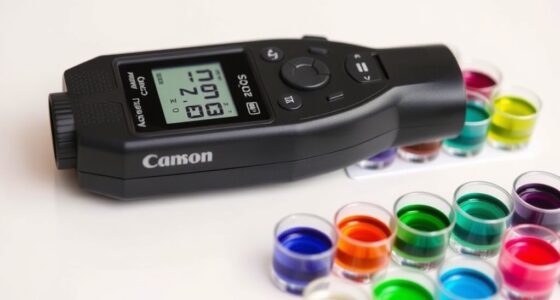
To perform professional white balance calibration, you need calibration tools like a colorimeter or spectrophotometer, which measure accurate color information. Additionally, using color targets such as a Gray Card or a Macbeth ColorChecker helps you set precise white points. These tools guarantee your camera captures true-to-life colors, resulting in consistently high-quality video. Make sure to follow calibration procedures carefully to achieve best results.
How Does Ambient Lighting Affect White Balance Calibration Accuracy?
A stitch in time saves nine; the same applies to white balance calibration. Ambient lighting affects accuracy because fluctuating light changes color temperature and disrupts lighting consistency. When ambient light varies, your camera struggles to maintain correct white balance, leading to color shifts. To get the best results, calibrate in consistent lighting conditions, ensuring accurate colors and a professional look. Keep lighting steady for reliable white balance calibration.
Is Automatic White Balance Calibration Reliable for All Shooting Conditions?
Auto mode can be reliable in many situations, but it doesn’t always handle challenging lighting conditions well. You might find that automatic white balance calibration struggles with mixed or rapidly changing light, leading to color inaccuracies. In such cases, manual adjustment is your best bet. You should switch to manual mode when precision matters, allowing you to fine-tune the white balance for consistent, accurate colors across all shooting conditions.

ALR Projector Screen for Standard Throw- Wall Mounted - High Contrast 70% ALR High Brightness 2.7X Gain - 120 inch 16:9 Gray Screen-by SilverMagic
★【Ambient Light Rejection】 The screen effectively suppresses ambient light (70%), significantly improving image contrast. This makes it suitable...
As an affiliate, we earn on qualifying purchases.
Conclusion
Now that you understand how to calibrate your white balance, it’s almost like your camera knows exactly what you see. It’s funny how those small adjustments can make your photos look so natural, isn’t it? When your camera gets it right, you’ll notice the difference in every shot—suddenly everything feels just right. So, next time you’re behind the lens, trust that calibration, and let your images reflect what you truly see.

TMY 1080P Full HD Portable Mini Projector, Upgraded Bluetooth Movie Projector with Screen, Compatible with TV Stick Smartphone/HDMI/USB, Indoor & Outdoor Use
【Portable Projector Screen Included】The V08 mini projector includes a projection screen that is tailored to meet our customer's...
As an affiliate, we earn on qualifying purchases.

Official Licensed Google TV Smart Projector, HAPPRUN 4K UHD Home Theater with Dolby Sound, Wi-Fi & Bluetooth, Built-in Streaming Apps, Compatible with Games Consoles & Smartphone, Indoor & Outdoor Use
[ Built-in Official Licensed Google TV ] - Without additional equipment, the smart projector can directly access Netflix,...
As an affiliate, we earn on qualifying purchases.