For outdoor projection, your throw distance depends on your screen size and projector brightness. Generally, shorter distances provide brighter images with better contrast, while longer distances increase size but may reduce brightness. Aim for a distance that balances a clear, vibrant picture without losing detail or clarity. To get the best results, consider ambient light and the projector’s lumen output. Keep exploring further; you’ll discover how to fine-tune your setup for ideal outdoor projections.
Key Takeaways
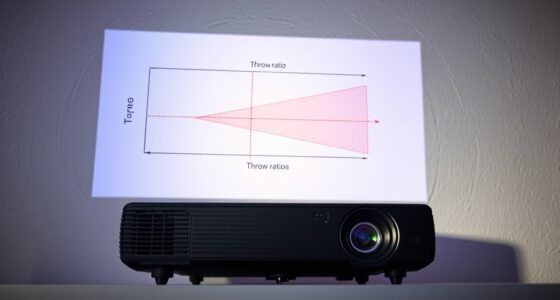
- The optimal throw distance depends on the projector’s throw ratio and desired image size.
- Closer throw distances increase contrast and brightness but limit maximum image size.
- Longer distances are needed for larger images, but may reduce brightness if projector lumens are insufficient.
- Adjusting throw distance helps balance image clarity, size, and ambient light conditions outdoors.
- Proper setup ensures the projector remains aligned with the screen center for optimal image quality.

Ever wondered how far your outdoor projector needs to be from the screen to deliver a clear, bright image? The answer depends on several factors, but understanding projection angle and ambient light plays a vital role. The projection angle refers to the angle at which your projector’s lens directs light toward the screen. If you set the projector too close or at an incorrect angle, you risk losing image clarity or creating distortion. Conversely, a proper projection angle helps maximize image quality, ensuring the light hits the screen evenly and reduces keystone distortion. When choosing your throw distance, aim for a setup where the projector’s lens aligns with the center of the screen, maintaining a consistent projection angle that accommodates the size of your display.
Ambient light substantially impacts your outdoor projection quality. If there’s too much ambient light, especially in the evening or during a bright day, your image can appear washed out or dim. To combat this, you need a projector with sufficient brightness—measured in lumens—and a throw distance that allows the projector to produce a brighter image. Generally, placing the projector closer to the screen increases contrast and brightness because less light gets dispersed, but this isn’t always feasible if you want a larger image. On the other hand, increasing the distance can enlarge the picture, but it may make the image dimmer if your projector isn’t bright enough. The key is balancing your ambient light conditions with your projector’s lumen output and the appropriate throw distance to achieve a vivid, clear picture.
Another consideration is how the projection angle interacts with throw distance. If your projector is placed at an awkward angle—say, too high or too low relative to the screen—it can cause image distortion or uneven brightness. Adjusting the projection angle by repositioning the projector or tilting it slightly can help optimize image clarity. For outdoor setups, using a mount or tripod that allows precise angle adjustments makes it easier to align everything properly.

2000 ANSI 4K Decoding Projector with WiFi and Bluetooth, HAPPRUN Movie Home Theater with Auto Focus, 300'' Display for Indoor/Outdoor, Smart Proyector Compatible with Phone/TV Stick/PC/PS5
[EASIER OPERATION: AI Smart Screen Adjustment] HAPPRUN projector comes with auto focus and 6D auto-keystone technology, enjoy a...
As an affiliate, we earn on qualifying purchases.
Frequently Asked Questions
How Do Weather Conditions Affect Outdoor Projection Throw Distance?
Weather conditions can considerably impact your outdoor projection throw distance. Rain, fog, or high humidity reduce visibility and clarity, making it harder to project clearly over long distances. Wind can shake equipment, affecting image stability. Choose weather-flexible equipment designed for outdoor use and guarantee durability against elements. Protect your gear with weatherproof covers and plan for adjustments based on current conditions to maintain ideal projection quality and distance.
What Is the Impact of Ambient Light on Projection Throw Distance?
Ambient light considerably reduces your outdoor projection’s effective throw distance. When there’s too much ambient light, you need higher projection brightness to maintain a clear image. Without enough brightness, your image appears washed out or difficult to see, forcing you to move the projector closer to the screen. To avoid this, make sure you minimize ambient light or select a projector with high lumens to extend your throw distance and achieve better visibility.
Can Outdoor Projectors Be Adjusted for Different Throw Distances Easily?
Yes, outdoor projectors can be modified for different throw distances easily. You’ll want to look for models with an adjustable lens, which allows you to change the throw ratio to suit your setup. This flexibility makes it simple to project clear images at various distances, whether you’re aiming for a large display far back or a closer view. Just ensure the projector has an adjustable lens to easily modify the throw ratio as needed.
How Does Screen Size Influence Optimal Throw Distance?
You might think larger screens need longer throw distances, but it’s more about maintaining proper projection focus. As screen size increases, you need to adjust your projector’s throw distance accordingly to guarantee a sharp image. Bigger screens don’t always mean more space; instead, focus on balancing screen size with your projector’s capabilities. Properly aligning projection focus ensures clear visuals, no matter the screen size, creating an engaging outdoor viewing experience.
Are There Specific Projector Models Suited for Long Outdoor Throw Distances?
Yes, there are projector models suited for long outdoor throw distances. Look for projectors with specific specifications, like high lumens and long-throw lens options, designed for extensive distances. These models often feature powerful projectors with adjustable lens zoom, allowing you to tailor the throw distance to your outdoor setup. Research brands that specialize in outdoor projectors, ensuring they meet your brightness and lens requirements for ideal image quality.

Epson Home Cinema 980 3-Chip 3LCD 1080p Projector 4,000 Lumens Color and White Brightness, Streaming/Gaming/ Media Room, Built-In Speaker, Auto Picture Skew, 16000:1 Contrast, 2 HDMI Ports
Exceptional Picture Quality — Provides stunning, detailed 1080p images and fast data processing that’s optimized for fast-action sports,...
As an affiliate, we earn on qualifying purchases.
Conclusion
Now, picture your outdoor space illuminated by a vibrant, crystal-clear image, stretching across the night sky like a glowing canvas. As you adjust your projector’s throw distance, the scene comes alive—bright and sharp, inviting everyone to gather and watch. With the right distance, your outdoor projection transforms your backyard into a mesmerizing wonderland, where shadows dance and memories are made under a starry canopy. Just fine-tune, and let the magic unfold.

ViewSonic LS740W 5500 Lumens WXGA Laser Projector with 1.3X Optical Zoom, H/V Keystrone, 360 Degrees Projection for Auditorium, Conference Room, and Education
High Brightness Laser Projector: WXGA (1280x800p) resolution with a 1.2-1.5 throw ratio and 5,500 ANSI lumens for clear,...
As an affiliate, we earn on qualifying purchases.
![[Official Google TV]Smart Projector 4K Supported with WiFi & Bluetooth, Built-in Official Apps, GoogIe Voice, Outdoor Movie Projector with DoIby Audio, Auto Focus, Home Theater Proyector WIMIUS G1](https://m.media-amazon.com/images/I/515NcMYy-FL._SL500_.jpg)
[Official Google TV]Smart Projector 4K Supported with WiFi & Bluetooth, Built-in Official Apps, GoogIe Voice, Outdoor Movie Projector with DoIby Audio, Auto Focus, Home Theater Proyector WIMIUS G1
[All-in-One Google TV Built-In] G1 Smart projector comes fully integrated Google TV—no website version, no stripped-down system. Access...
As an affiliate, we earn on qualifying purchases.