To calibrate image geometry for wide rooms, you need to correct lens distortions that can skew straight lines and distort proportions. Start by capturing images of a known calibration pattern, like a checkerboard, from various angles. Use calibration software to identify distortion parameters and adjust your images accordingly. This process guarantees true-to-life spatial representation, making your room appear accurately. Keep exploring these techniques, and you’ll learn how to achieve precise, distortion-free visuals.
Key Takeaways
- Capture images of known calibration patterns, like checkerboards, to identify lens distortion parameters.
- Use calibration software to analyze images and compute distortion coefficients for the camera lens.
- Apply mathematical correction algorithms based on calibration data to straighten radial and tangential distortions.
- Utilize appropriate camera projection models to accurately map 3D space onto 2D images of wide rooms.
- Perform calibration regularly to ensure geometric accuracy, enabling precise measurements and realistic visualizations of large spaces.

Have you ever wondered how cameras transform three-dimensional scenes into two-dimensional images? It’s a fascinating process, especially when you’re trying to capture a wide room where perspective and accuracy are vital. When you take photos of large spaces, distortions often occur, making straight lines appear bent or skewed. This phenomenon is mainly due to lens distortion, which happens because lenses can bend light unevenly, especially at the edges. If you don’t address this distortion, your images won’t accurately represent the space, leading to misleading visuals. To achieve accurate representation, you need to understand projection correction, a process that compensates for these distortions and helps produce geometrically accurate images.
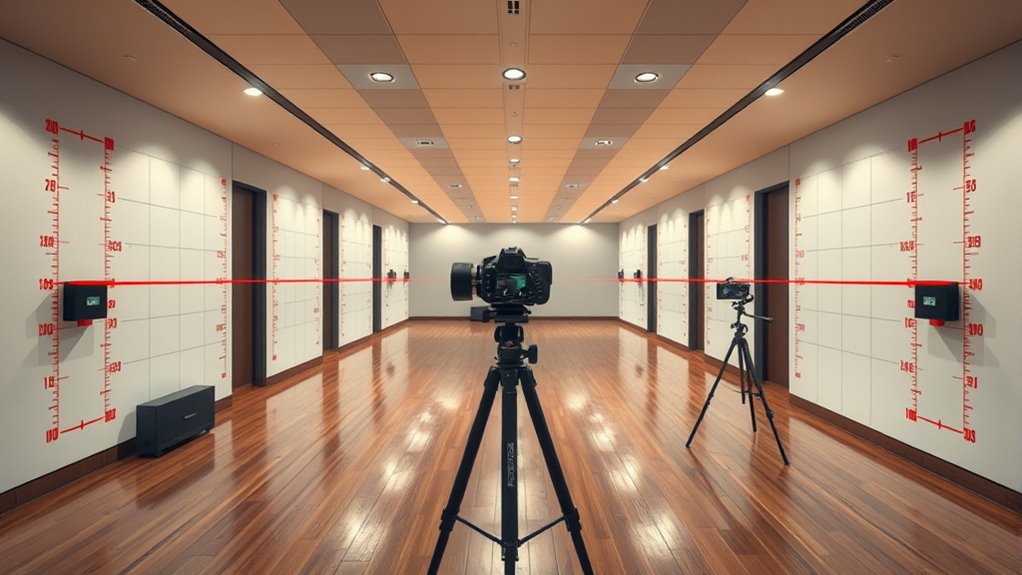
Lens distortion can be categorized into radial and tangential types. Radial distortion causes straight lines to bow outward or inward, creating barrel or pincushion effects. Tangential distortion occurs when the lens isn’t perfectly aligned with the camera sensor, causing images to tilt or skew. When photographing wide rooms, these distortions become more noticeable because the wider the angle, the more pronounced the effect. To correct this, you should calibrate your camera beforehand, capturing images of a known pattern—like a checkerboard or grid—and analyzing how the lines deviate from their true positions. This calibration helps you identify the specific lens distortion parameters. Once you have these, you can apply projection correction algorithms, which mathematically adjust the image to straighten lines and restore the true proportions of the scene.
Projection correction isn’t just about fixing distortion; it also involves understanding the camera’s projection model. Cameras project a three-dimensional scene onto a two-dimensional plane through a process that can be approximated by pinhole models or more complex lens models. When you calibrate your camera, you determine the parameters of this projection, including focal length, principal point, and distortion coefficients. Using these parameters, software tools can then correct the image, removing the unwanted effects of lens distortion. This process guarantees that straight lines in the real world remain straight in your images, which is especially important when mapping large interior spaces where accuracy matters.
In practice, calibration and projection correction are essential steps for any project requiring precise measurements or realistic renderings of wide rooms. They allow you to produce images that are true to life, free from the warping introduced by lens imperfections. By understanding how lens distortion occurs and applying the right correction techniques, you’ll gain a much clearer, more accurate visual representation of large spaces. This not only improves the quality of your images but also enhances your ability to analyze, measure, and present expansive environments with confidence. Recognizing the importance of lens distortion correction can make the difference between an inaccurate portrayal and a precise, true-to-life visualization.

Official Licensed Google TV Smart Projector, HAPPRUN 4K UHD Home Theater with Dolby Sound, Wi-Fi & Bluetooth, Built-in Streaming Apps, Compatible with Games Consoles & Smartphone, Indoor & Outdoor Use
[ Built-in Official Licensed Google TV ] - Without additional equipment, the smart projector can directly access Netflix,...
As an affiliate, we earn on qualifying purchases.
Frequently Asked Questions
Can Calibration Be Automated for Large-Scale Room Setups?
Yes, calibration can be automated for large-scale room setups using advanced algorithms. These automated algorithms streamline the process, reducing manual effort and ensuring precise alignment across extensive areas. By leveraging machine learning and sensor data, you can quickly calibrate multiple devices simultaneously, saving time and minimizing errors. This approach makes managing large-scale setups more efficient, consistent, and reliable, especially in complex environments where manual calibration would be cumbersome.
What Are Common Errors During Image Geometry Calibration?
You might find that lens distortion and marker detection issues are common pitfalls during image geometry calibration. These errors often occur when the lens warps the image or when markers aren’t detected accurately, leading to misalignments. To avoid these, guarantee proper lens calibration and clear, well-placed markers. Taking time to double-check these details helps keep your setup precise, making the calibration process smoother and more reliable.
How Does Room Lighting Affect Calibration Accuracy?
Room lighting conditions directly impact calibration precision because poor or uneven lighting can cause inaccuracies in detecting calibration targets or reference points. Bright, consistent lighting helps you clearly identify geometric features, while dim or variable lighting introduces shadows and glare, leading to errors. To guarantee accurate calibration, you should optimize lighting conditions for even illumination, reducing shadows and reflections that could distort measurement accuracy.
Is Specialized Equipment Necessary for Calibration?
You don’t always need specialized equipment for calibration; simple calibration tools like a ruler or a laser distance meter can guarantee. For example, in a recent case, a wide room with accurate room dimensions was calibrated using just a measuring tape and a camera, ensuring precise image geometry. These tools help you account for room size and ensure accurate calibration without expensive gear, making the process accessible and straightforward.
How Often Should Calibration Be Repeated for Optimal Results?
You should perform calibration regularly, ideally every six months or after any major changes to your setup, to guarantee ideal calibration timing. Frequent calibration frequency helps maintain image accuracy and prevents distortions. Keep an eye on visual quality and alignment—if you notice issues, it’s a sign to recalibrate. Consistent calibration ensures your wide room’s image geometry remains precise, providing the best viewing experience over time.
1500 ANSI Official Licensed Google TV Smart Projector, HAPPRUN 4K Full HD Home Theater with Auto Focus, Dolby Sound, Wi-Fi Bluetooth, Built-in Apps, Compatible with Phone & PC, Indoor & Outdoor Use
[ Built-in Officially Licensed Google TV ]-Enjoy the reliability of an officially certified Google TV projector. Stream Netflix,...
As an affiliate, we earn on qualifying purchases.
Conclusion
By calibrating your image geometry, you’re fundamentally tuning your camera like a fine instrument, ensuring every shot captures the room’s true proportions. This process transforms a distorted view into a clear window, revealing the space as it truly is. When you master this calibration, your wide-room images will stand tall and accurate, turning your photos into a reliable map rather than a funhouse mirror. It’s the final brushstroke that brings your wide-angle vision into perfect focus.

Epson Home Cinema 980 3-Chip 3LCD 1080p Projector 4,000 Lumens Color and White Brightness, Streaming/Gaming/ Media Room, Built-In Speaker, Auto Picture Skew, 16000:1 Contrast, 2 HDMI Ports
Exceptional Picture Quality — Provides stunning, detailed 1080p images and fast data processing that’s optimized for fast-action sports,...
As an affiliate, we earn on qualifying purchases.

2000 ANSI 4K Decoding Projector with WiFi and Bluetooth, HAPPRUN Movie Home Theater with Auto Focus, 300'' Display for Indoor/Outdoor, Smart Proyector Compatible with Phone/TV Stick/PC/PS5
[EASIER OPERATION: AI Smart Screen Adjustment] HAPPRUN projector comes with auto focus and 6D auto-keystone technology, enjoy a...
As an affiliate, we earn on qualifying purchases.