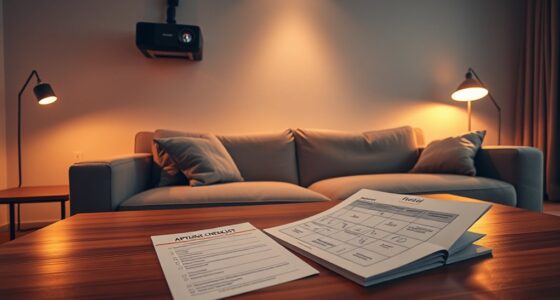
If you’re troubleshooting your short throw projector in an apartment, start by checking the focus, lens cleanliness, and ensuring your room has controlled lighting. Confirm all connections are secure and update firmware when needed. Adjust the placement to avoid glare and improve image clarity. For sound issues, optimize speaker placement and improve insulation. Proper maintenance and small upgrades can boost performance over time. Keep exploring this guide to uncover more tips for resolving common short throw projector troubles.
Key Takeaways
- Choose short throw projectors with low throw ratios for minimal space requirements in apartments.
- Ensure proper placement, secure mounting, and ventilation to optimize image quality and safety.
- Troubleshoot image clarity by adjusting focus, cleaning the lens, and controlling ambient lighting.
- Verify and secure all connectivity cables; update firmware to resolve compatibility issues.
- Use ambient light control, soundproofing, and regular maintenance to enhance viewing experience in small spaces.

BenQ W4100i 4K HDR Smart Home Theater Projector, 3200 Lumens, 100% DCI-P3, Rec.709, Factory-Calibrated, Android TV with Netflix, 4-Way Lens Shift, HDR10+ & HLG Support, LED Long Lifespan
PROJECTOR-OPTIMIZED TRUE 4K UHD and HDR: HDR-PRO technology exclusive Local Contrast Enhancer and Tone Mapping for perfect details...
As an affiliate, we earn on qualifying purchases.
Understanding Short Throw Projectors and Why They Matter in Apartments

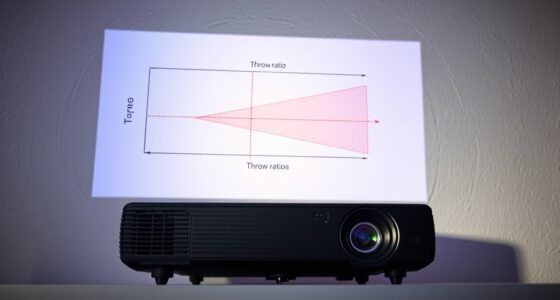
Because space is often limited in apartments, choosing the right projector can make a big difference. Short throw projectors are designed to produce a large screen size from a short distance, which is perfect for small rooms. Their throw ratio, which measures how far the projector needs to be from the screen to display a specific size, is vital. A lower throw ratio means you can set up the projector closer to the wall or screen, saving space and reducing clutter. This allows you to enjoy a big, immersive image without sacrificing valuable floor space. Understanding how throw ratio impacts screen size helps you select a projector that fits comfortably in your apartment while delivering an ideal viewing experience. Additionally, awareness of eye patch benefits can be useful if you spend long hours in front of screens, helping to maintain eye health in confined spaces. Recognizing compact projector designs can further aid in choosing models that maximize space efficiency without sacrificing performance. Moreover, exploring adjustable lens features can help fine-tune focus and image size for optimal viewing in tight spaces. Incorporating healthy lighting habits can also reduce eye strain during extended viewing sessions, making your space more comfortable. Considering essential oil diffusers might also enhance your environment, creating a relaxing atmosphere during movie nights.

ViewSonic LS740W 5500 Lumens WXGA Laser Projector with 1.3X Optical Zoom, H/V Keystrone, 360 Degrees Projection for Auditorium, Conference Room, and Education
High Brightness Laser Projector: WXGA (1280x800p) resolution with a 1.2-1.5 throw ratio and 5,500 ANSI lumens for clear,...
As an affiliate, we earn on qualifying purchases.
Key Features to Look for When Choosing a Short Throw Projector

When selecting a short throw projector for your apartment, focusing on its key features can guarantee you get the best viewing experience without sacrificing space. First, consider the screen size it can project; a larger screen enhances your viewing, but verify it fits comfortably in your room. Next, look at the throw ratio—the smaller it is, the closer the projector needs to be to the wall or screen, saving valuable space. A low throw ratio means you can place the projector near your wall, ideal for compact apartments. Additionally, check for brightness levels to ensure clear images even in well-lit rooms. Finally, consider resolution—higher resolutions provide sharper images, which are essential for an enjoyable viewing experience in smaller spaces. Understanding the contrast ratio of the projector can also greatly impact image quality, especially in darker rooms, by providing deeper blacks and more detailed images.

ViewSonic PX700HDH DLP 1080p Projector with 3700 Lumens, Supercolor, 1.1x Optical Zoom, 22000:1 Contrast Ratio, Dual HDMI, and Vertical Keystone for Home Theater
Full HD Home Theater Projector: FHD (1920x1080p) resolution with a 1.5-1.6 throw ratio and 3,700 ANSI lumens perfect...
As an affiliate, we earn on qualifying purchases.
Setting Up Your Short Throw Projector in a Compact Space

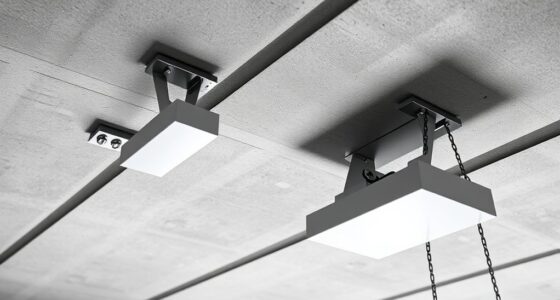
Setting up your short throw projector in a compact space requires careful planning to maximize your available area. First, choose a strategic wall location to minimize obstructions and optimize image size. Wall mounting techniques are essential; secure brackets that keep the projector stable and aligned properly. Consider decorative options like stylish mounts or camouflage casings to blend the setup into your room decor. Keep enough clearance behind the projector for heat dissipation and easy adjustments. Use a low-profile mount to save space and prevent clutter. If wall mounting isn’t feasible, a sturdy shelf can work, but ensure it’s level and secure. Additionally, understanding space optimization techniques can help you make the most of limited areas. Incorporating proper ventilation is also key to maintaining projector performance and longevity in small spaces. Proper organizing and decluttering of your setup area can further improve accessibility and overall aesthetics. Moreover, implementing lighting considerations can prevent glare and enhance picture quality during use. Furthermore, selecting natural materials like wood or stone for nearby furniture can enhance the room’s aesthetic while reducing visual clutter. Ultimately, a well-planned setup with thoughtful decorative options and proper mounting techniques ensures a clean, functional, and visually appealing display in your compact apartment.

XGIMI Horizon 20 Max 4K Projector Triple Laser Home Theater, 2025 New, 5700 ISO Lumens, Google TV with Licensed Netflix, Optical Zoom Lens Shift, IMAX Enhanced, Dolby Vision, 20000:1 Contrast
Lossless Optics: Flexible lens shift and optical zoom give you more freedom in setup—without sacrificing clarity. Enjoy crisp,...
As an affiliate, we earn on qualifying purchases.
Common Troubleshooting Tips for Image Clarity and Brightness Issues

If your image isn’t clear or bright enough, start by adjusting the focus until the picture sharpens. Next, check the ambient lighting in your space and reduce glare or reflections that could be dimming the image. Finally, verify your projector settings to make certain brightness, contrast, and other image options are optimized for your room. Additionally, consider filter maintenance to ensure your projector’s internal components are free of dust and debris, which can impact image clarity. Ensuring your device automation functions correctly can also help maintain consistent image quality, especially if your projector uses automated adjustments. Incorporating AI-powered calibration tools can further optimize your display settings for the best possible image clarity and brightness.
Adjust Focus Properly
Properly adjusting the focus on your projector is essential for sharp, clear images. Start by using lens calibration to fine-tune the lens, ensuring the image is crisp across the entire screen. If the picture appears distorted or uneven, apply keystone correction to straighten the image. Adjust the focus ring slowly until the image becomes sharp and defined, avoiding any blurriness. Sometimes, small tweaks in lens calibration can improve clarity without needing to reposition the projector. Remember, precise focus isn’t just about sharpness; it also affects brightness and overall image quality. Take your time to fine-tune these settings to get the clearest picture possible, especially in a tight apartment space where minor adjustments make a big difference. Additionally, understanding industry trends can help you optimize your setup for the best possible image quality. Proper maintenance and regular cleaning of the lens can also prevent dust buildup that causes image clarity issues. Regularly checking and adjusting the focus mechanism can help maintain optimal image sharpness over time. To achieve the best results, consider using test patterns to evaluate and refine your focus adjustments accurately.
Check Ambient Lighting
Ambient lighting plays a crucial role in how well your projector image appears, especially in a small apartment where lighting conditions can vary throughout the day. Too much ambient light, particularly from natural light sources like windows, can wash out your image, reducing brightness and clarity. To improve picture quality, control ambient lighting by closing curtains or blinds during viewing. Turn off or dim nearby lights that cause glare or reflections. Consider repositioning your projector away from direct natural light or adjusting window treatments to reduce light spill. Reducing excess ambient light helps your projector produce a brighter, sharper image. Remember, the goal is to create a balanced lighting environment that minimizes interference from natural and artificial light sources, ensuring your image remains clear and vibrant. Managing ambient light levels effectively is essential for maintaining optimal image clarity and brightness in your viewing space. Additionally, consulting store hours for beauty retailers can help you plan shopping trips for equipment or accessories needed to optimize your space. Incorporating lighting control devices such as smart switches or dimmers can further help in adjusting lighting conditions quickly and efficiently. For optimal results, consider using light-blocking window treatments to further reduce unwanted natural light during critical viewing times.
Verify Projector Settings
Are your projector’s image quality and brightness not meeting expectations? The first step is to verify your projector settings. Check the projector lens for dirt or smudges that can blur the image. Ensure your image calibration is accurate, matching the aspect ratio and keystone correction. Adjust the brightness and contrast settings to optimize clarity. Confirm that your resolution aligns with your device’s output. Review the picture mode—switch to cinema or presentation for better image quality. You might also need to reset the projector to factory defaults if settings are misconfigured. Remember, proper image calibration maximizes image clarity and brightness, making your viewing experience more enjoyable. Regularly reviewing these settings prevents common issues and keeps your projector performing at its best.
Resolving Connectivity Problems With Your Projector and Devices

If your projector isn’t connecting properly, start by checking all HDMI connections to make certain they’re secure. Next, adjust the input settings on your projector and device to match each other. Finally, update your device’s firmware to fix any bugs that might be causing connectivity issues.
Check HDMI Connections
To guarantee your projector displays content correctly, start by checking all HDMI connections. Loose or damaged cables are common causes of connectivity issues. Ensure the HDMI cable is firmly plugged into both the projector and your device. During HDMI troubleshooting, verify that you’re using a cable compatible with your devices, as incompatible cables can cause signal loss. Also, inspect for bent or broken pins. Use high-quality HDMI cables to prevent interference. If problems persist, try swapping the cable with a known working one. Keep in mind that some projectors require specific HDMI versions for certain features. Proper connection and cable compatibility are essential to maintain a steady signal and clear display.
- Confirm all HDMI connections are secure
- Test with different HDMI cables
- Check for visible damage or bent pins
- Use cables rated for your device’s HDMI version
- Avoid cheap, low-quality HDMI cords
Adjust Input Settings
Adjusting input settings is often the key to resolving connectivity issues between your projector and devices. Start by checking the input source to verify it matches the device you’re using, like HDMI or VGA. If your image appears delayed or blurry, reduce input lag by toggling any available game or fast mode settings. Proper color calibration is also essential; access the projector’s menu to fine-tune brightness, contrast, and color balance for accurate images. Sometimes, mismatched settings cause signals to falter or display improperly. Keep in mind that incorrect input configuration can lead to lag or color distortion, so modifying these parameters often fixes the problem. Making these small tweaks helps ensure your projector communicates smoothly with your devices, providing a clearer, more responsive viewing experience.
Update Device Firmware
Updating your device firmware can markedly improve connectivity between your projector and other devices. Firmware updates fix bugs, enhance performance, and boost device compatibility. To guarantee smooth operation, regularly check for available updates from the manufacturer’s website or app. Here are key tips:
- Confirm your model before downloading firmware updates
- Use a stable internet connection during the update
- Follow manufacturer instructions carefully
- Restart your projector after completing the update
- Keep your device’s firmware current to prevent future connectivity issues
Dealing With Sound and Audio Challenges in Small Living Areas

Living in a small apartment often means dealing with sound issues that can quickly become distracting. To reduce noise, start with soundproofing tips like adding rugs, heavy curtains, or weatherstripping doors and windows. These simple steps help block out external noise and contain sound within your space. Upgrading your audio equipment can also improve your listening experience; choose speakers with better sound insulation or consider wall-mounted options that save space and minimize clutter. Position your speakers carefully to avoid sound bouncing off walls, which can create echo or distortion. Additionally, using sound-absorbing panels or foam can further dampen noise and improve audio clarity. With these strategies, you can enjoy your favorite shows or music without disturbing neighbors or being disturbed yourself.
Maintaining Your Projector for Optimal Performance

To keep your projector delivering sharp images and vibrant colors, regular maintenance is key. Proper upkeep guarantees ideal performance and longevity. Focus on color calibration to maintain accurate hues and prevent dull or oversaturated images. Regularly clean the lens to avoid dust and fingerprints that can blur images. Check the lens for scratches and clean it gently with a microfiber cloth. Keep the vents and filters free of dust to prevent overheating. Adjust the projector’s settings periodically to maximize brightness and contrast. If your projector has a focus adjustment, fine-tune it for crisp images. Use compressed air to clear out internal components. Finally, update the firmware when available to fix bugs and improve features. Consistent maintenance keeps your projector functioning at its best.
When to Seek Professional Help or Consider Upgrading

While regular maintenance can keep your projector running smoothly, there are times when it’s best to seek professional help or consider upgrading. If you notice persistent image quality issues, uneven brightness, or hardware malfunctions, professional maintenance is essential. Technicians can diagnose problems beyond simple troubleshooting, ensuring your projector operates efficiently. Additionally, if your current short throw projector no longer meets your needs—such as insufficient brightness or outdated features—hardware upgrades might be necessary. Upgrading to a newer model with better resolution or improved connectivity can enhance your viewing experience. Recognizing when issues go beyond basic fixes ensures you don’t waste time or money. Sometimes, investing in professional maintenance or a hardware upgrade is the most effective way to keep your apartment entertainment setup ideal.
Frequently Asked Questions
Can Short Throw Projectors Be Used Outdoors in Apartments With Balconies?
Yes, you can use short throw projectors outdoors on balconies, but you should consider outdoor projector considerations carefully. Brightness is key, so choose a model with high lumens to overcome balcony lighting impact. Also, guarantee your projector is weather-resistant or protected from elements like rain and wind. Proper placement and shading help improve image quality, making outdoor balcony setups more effective for enjoying content outside.
How Do Ambient Light Levels Affect Projector Image Quality in Small Spaces?
Ambient light considerably impacts your projector’s image quality, especially in small spaces. When there’s too much ambient light, images appear washed out and less vibrant, making it harder to see details clearly. To improve image quality, you should control the ambient light by dimming lights, closing curtains, or using blackout blinds. Keeping the room darker allows your projector to display sharper, brighter images, enhancing your viewing experience.
Are There Specific Wall Colors That Improve Projection Clarity?
Ever wonder why your projector’s image looks dull or blurry? Choosing the right wall color can make a big difference. Light, matte shades like soft whites, light grays, or pastel tones enhance projection clarity and improve image quality. Avoid dark or glossy wall paint, which can absorb or reflect light unevenly. By selecting a neutral, matte wall color, you’ll create a perfect canvas that boosts your projector’s performance and clarity.
What Safety Precautions Should I Take When Setting up a Projector in a Tight Space?
When setting up a projector in a tight space, prioritize electrical safety by checking for damaged cords and avoiding overloads. Make certain mounting stability by securely attaching the projector to a sturdy surface or wall mount designed for your model. Keep cables organized to prevent tripping hazards, and always turn off and unplug the device before adjusting or repositioning it. These precautions help keep you safe and protect your equipment.
How Often Should I Clean or Replace Projector Filters and Bulbs?
You should clean your projector filters every 1,000 to 2,000 hours of use to maintain ideal airflow and prevent overheating. Follow your manufacturer’s filter replacement schedule, typically every 6 to 12 months. For bulbs, replace them when your projector shows a dimmer image or after about 1,500 to 3,000 hours of operation. Regular projector maintenance ensures longevity and consistent performance, keeping your setup in top shape.
Conclusion
By understanding what short throw projectors offer, knowing how to set them up properly, troubleshooting common issues, and maintaining their performance, you can enjoy a seamless viewing experience. Embrace the ease of quick fixes, stay proactive with regular upkeep, and recognize when to seek help or upgrade. With these tips, you’ll turn your small space into a big-screen haven—bright, clear, and hassle-free. Your perfect home theater is just a few steps away.