When replacing your projector lamp, first turn off and unplug the device, allowing it to cool. Carefully remove the lamp cover, then handle the new lamp with gloves to avoid oils. Insert the new lamp securely and replace the cover. To reset the lamp timer, locate the reset button or menu—usually near the lamp compartment or on the control panel—and hold it for a few seconds or follow on-screen instructions. Keep going to discover detailed steps and tips that make certain smooth maintenance.
Key Takeaways
- Turn off, unplug, and cool the projector before replacing the lamp to ensure safety.
- Remove the lamp cover using screws or clips, then carefully replace the lamp with a new one, handling it with gloves.
- Secure the new lamp firmly into its socket with a click, then reattach the cover and tighten fasteners.
- Locate the reset button, usually near the lamp compartment or on the control panel, and press and hold it to reset the timer.
- Use the projector’s on-screen menu or control panel to confirm the lamp timer has been reset for accurate usage tracking.

Replacing your projector lamp and resetting the timer is essential for maintaining ideal performance. When it comes to lamp durability, understanding how long your lamp is likely to last can save you from unexpected shutdowns. Most projector lamps are rated for a specific number of hours—often between 2,000 to 4,000 hours—before their brightness diminishes and they need replacing. Keeping track of your usage helps you plan ahead, ensuring your projector performs optimally when you need it most. Once the lamp reaches its limit, you’ll notice a decline in image quality or a warning message on your projector. Ignoring these signs can lead to decreased lamp durability and, ultimately, a sudden failure that interrupts your presentation or viewing experience. That’s why it’s crucial to replace the lamp at the right time and reset the timer afterward to accurately monitor future usage.
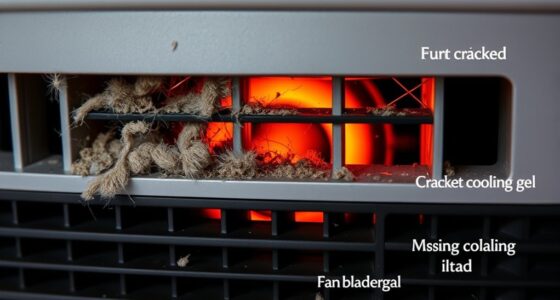
The process of replacing the lamp begins with turning off your projector and unplugging it, allowing the device to cool down completely. Once cooled, you’ll need to locate the lamp cover, which is usually secured with screws or clips. Carefully remove the cover to access the lamp. When handling the new lamp, avoid touching the bulb itself with your fingers, as oils from your skin can reduce its lifespan. Use gloves or a clean cloth for installation. Insert the new lamp firmly into its socket, ensuring it clicks into place securely. After installing the new lamp, replace the cover and tighten any screws or clips.
Resetting the timer is the next step to keep accurate track of your lamp’s durability. The reset button location varies depending on the projector model, but it’s typically found near the lamp compartment or on the projector’s control panel. Consult your user manual if you’re unsure where it’s located. To reset, press and hold the reset button for a few seconds, often with a paperclip if it’s recessed. Some projectors may require navigating through the on-screen menu to find the reset option, which you can do via the remote or control panel. Resetting the timer ensures your device accurately records the new lamp’s usage, helping you monitor its lifespan more effectively. Additionally, understanding the importance of powerful persuasive words can help you communicate maintenance needs more effectively with service providers or colleagues. Remember, resetting the timer without replacing the lamp won’t restore its lifespan, but it will keep your maintenance schedule on track.

2000 ANSI 4K Decoding Projector with WiFi and Bluetooth, HAPPRUN Movie Home Theater with Auto Focus, 300'' Display for Indoor/Outdoor, Smart Proyector Compatible with Phone/TV Stick/PC/PS5
[EASIER OPERATION: AI Smart Screen Adjustment] HAPPRUN projector comes with auto focus and 6D auto-keystone technology, enjoy a...
As an affiliate, we earn on qualifying purchases.
Frequently Asked Questions
How Often Should I Replace My Projector Lamp?
You should replace your projector lamp when it reaches its lamp lifespan, typically around 1,500 to 2,000 hours of use, depending on the model. Keep an eye on the projector’s warning indicators, as they’ll alert you when replacement is needed. Regularly tracking your usage helps you determine the ideal replacement frequency, ensuring peak image quality and preventing unexpected shutdowns. Don’t wait too long—timely replacement keeps your projector performing its best.
Can I Use Any Brand of Replacement Lamp?
Imagine swapping out a worn-out bulb for a bright, reliable glow. You can’t just use any brand of replacement lamp because brand compatibility matters. Using the right brand guarantees ideal lamp quality, preventing flickering or dimming. Stick to your projector’s recommended brands to maintain performance and avoid damage. This way, your projector stays vibrant and functional, delivering the clear images you want without risking costly repairs.
What Safety Precautions Are Recommended During Lamp Replacement?
You should always wear eye protection and disconnect the power before replacing the lamp. This prevents eye injury from broken glass or intense light exposure and avoids electrical shocks. Make sure the device is unplugged and cooled down before handling the lamp. Follow these safety steps carefully to protect yourself from hazards, ensuring a safe and smooth replacement process. Your safety is the top priority during this task.
How Do I Dispose of the Old Projector Lamp Properly?
You should dispose of the old projector lamp responsibly to guarantee environmental safety. Check with local waste management for specific lamp disposal guidelines, as many contain hazardous materials like mercury. Do not throw the lamp in regular trash. Instead, use designated recycling programs or hazardous waste collection sites. Proper lamp disposal helps protect the environment and complies with safety regulations, preventing potential health risks from hazardous substances.
Will Resetting the Lamp Timer Affect Warranty Coverage?
Resetting the lamp timer typically won’t affect your lamp warranty unless the manufacturer explicitly states otherwise. However, it’s important to note that reset effects might make it seem like the lamp is new, which can impact future warranty claims if the lamp fails soon after reset. Always check your warranty terms to see if resetting the lamp timer influences your coverage, and consider doing it only when necessary.
GooDee Video Projector With Wifi And Bluetooth, Smart Portable Projector Movie System Compatible With Netflix/Dolby Audio/Auto Focus & Keystone, 4k Video Decode & 1080p Native For Home Theater/Outdoor
「Smart TV Projector」The Goodee AC321 4K projector is officially licensed by mainstream streaming platforms such as Netflix/YouTube/Prime Video,...
As an affiliate, we earn on qualifying purchases.
Conclusion
Remember, replacing your lamp and resetting your device is simple—think of it like giving your gadget a quick boost. Some say a fresh lamp can even improve your device’s performance, almost like a mini upgrade. So, next time your lamp dims, don’t hesitate—swap it out and reset. It’s a small step that keeps your device running smoothly, proving that sometimes, a simple fix can make a big difference in your tech’s life.
![Projector with 5G WiFi and Bluetooth, Native 1080P Projector[Projector Screen Included], Full HD 18000LM Movie Projector, 100" Display Home Theater, Compatible with Phone/Laptop/TV Stick](https://m.media-amazon.com/images/I/51tJ+dTl5qL._SL500_.jpg)
Projector with 5G WiFi and Bluetooth, Native 1080P Projector[Projector Screen Included], Full HD 18000LM Movie Projector, 100" Display Home Theater, Compatible with Phone/Laptop/TV Stick
【2.4G/5G Dual-Band Wifi & Bluetooth Connection】 Roconia projector supports screen mirroring on iOS, Android and Windows devices without...
As an affiliate, we earn on qualifying purchases.
Epson Home Cinema 3800 4K PRO-UHD 3-Chip Projector with HDR
4K PRO-UHD (1) Projection technology — a new type of 4K home theater experience, utilizing advanced technologies for...
As an affiliate, we earn on qualifying purchases.