To build affordable DIY acoustic panels, gather materials like fiberglass or mineral wool, a basic wooden frame, breathable fabric, and mounting hardware. Focus on creating 2×4 foot panels and place them at reflection points and ear level to maximize sound absorption. Use recycled materials and simple tools for easy assembly and installation. Proper placement and secure mounting are key to effective treatment. Keep exploring for detailed steps to transform your space into an acoustically balanced zone.
Use inexpensive, recycled materials like mineral wool or fiberglass for effective sound absorption.
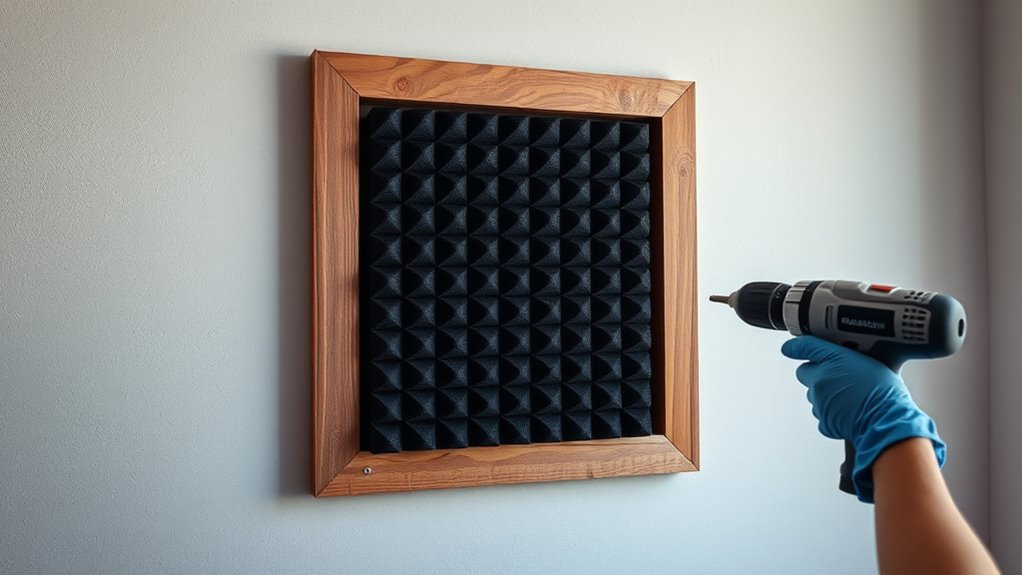
Build 2×4 foot panels with simple frames using basic tools and affordable wood or repurposed frames.
Cover panels with breathable fabrics such as muslin or burlap to contain particles and allow sound passage.
Mount panels at reflection points, ear level, or opposite speakers to maximize acoustic benefits.
Opt for removable mounting options like hooks or adhesive strips for easy installation and repositioning.
Are you looking for an affordable way to improve your room’s sound quality? Building DIY acoustic panels might be just the solution you need. These panels are a cost-effective method to enhance your space’s acoustics without breaking the bank. To start, understanding soundproofing techniques and room acoustic treatment is essential. While soundproofing focuses on blocking sound from entering or leaving a room, room acoustic treatment aims to control sound reflections within the space. With DIY acoustic panels, you primarily target the latter, reducing echo and improving clarity.
First, gather your materials. You’ll want some absorption material—fiberglass, mineral wool, or dense foam work well—and a frame to hold everything in place. Wooden or plastic frames are easy to build with basic tools. Cover your absorption material with breathable fabric, like burlap or muslin, which helps keep particles contained and allows sound waves to pass through efficiently. This creates a simple, functional panel that can be hung on your walls.
When constructing your panels, focus on size and placement. Larger panels generally absorb more sound, so aim for dimensions around 2×4 feet, but adjust based on your space. Mounting these panels at reflection points—areas where sound bounces directly from speakers or sources—maximizes their effectiveness. For example, place one directly opposite your speakers or at ear level when seated. Positioning your DIY panels strategically helps optimize room acoustic treatment, reducing flutter echoes and muffling unwanted reverberation.
You don’t need to spend a fortune to get good results. Use recycled or inexpensive materials, and consider repurposing old furniture or frames to save costs. Installing the panels is straightforward: use hooks, picture wire, or adhesive strips to hang them securely. If you’re in a rental or want flexibility, removable mounting options work best.
Klipsch R-12SW Powerful Deep Bass Front Firing 12" Copper-Spun Driver 400W Digital Power Subwoofer 14" X 18.5" X 16"
Powerful 12" copper-spun front-firing woofer
As an affiliate, we earn on qualifying purchases.
Frequently Asked Questions
How Do I Choose the Best Fabric for DIY Acoustic Panels?
For fabric selection, opt for breathable, tightly woven materials like cotton or polyester blends to guarantee sound absorption. Consider aesthetic options that match your decor, such as neutral tones or vibrant colors, since fabric choice impacts the panel’s look. Avoid thick or fuzzy fabrics, which can hinder sound absorption. Ultimately, pick a fabric that balances functionality with your style preferences, making your DIY acoustic panels both effective and visually appealing.
Can I Use Recycled Materials for Cost-Effective Panels?
Yes, you can definitely use recycled materials for cost-effective panels. Recycled fabrics, old blankets, or foam can work well and are eco-friendly options. Just guarantee the materials are safe, non-toxic, and provide good sound absorption. Using recycled materials not only saves money but also reduces waste, making your project more sustainable. Always test your materials to confirm they meet your acoustic needs before final installation.
What Tools Are Essential for Building Acoustic Panels?
You’ll need a power drill to cut and assemble the frame, making it sturdy and precise. A staple gun is essential for attaching fabric securely around the insulation, giving your panels a clean, professional look. These tools are the most important for building acoustic panels, ensuring ease and efficiency. Make sure to also have scissors or a utility knife for trimming fabric, and a measuring tape for accurate dimensions.
How Do I Ensure My Panels Are Fire-Safe?
Think of your panels as a fortress against fire’s fury. To guarantee safety, apply fire retardant treatments to your materials, creating an invisible shield that fights flames. Follow safety regulations closely, like a trusty map guiding your way. Using fire-retardant foam or mineral wool can turn your DIY project into a safe haven. Regularly check and maintain your panels to keep their protective armor strong, safeguarding your space from potential hazards.
How Do I Maintain or Clean My DIY Acoustic Panels?
To maintain your DIY acoustic panels, regularly dust them with a soft cloth or vacuum using a brush attachment. For cleaning techniques, gently spot clean with a damp cloth and mild soap if needed, avoiding soaking the panels. Follow maintenance tips like keeping them in low-humidity areas and avoiding direct sunlight to prevent deterioration. This keeps your panels looking good and functioning effectively for years.
Klipsch R-120SW Subwoofer, Black
12" high excursion spun-copper Imp woofer
As an affiliate, we earn on qualifying purchases.
Conclusion
Now that you know how to build and install your own acoustic panels, you’re ready to transform your space. Picture yourself crafting panels that absorb echoes, quieting your room, and enhancing your audio experience. Feel the satisfaction of a DIY project done right, the pride in your handiwork, and the comfort of a peaceful environment. With each panel you create, you improve your space, your sound, and your life—making every corner calmer, clearer, and more yours.
AC Infinity AIRPLATE S1, Quiet Cooling Fan System 4" with Speed Control, for Home Theater AV Cabinets
An ultra quiet fan system designed for cooling cabinets that requires minimal noise.
As an affiliate, we earn on qualifying purchases.
AC Infinity AIRPLATE S5, Quiet Cooling Fan System 8" with Speed Control, for Home Theater AV Cabinets
An ultra-quiet UL-certified fan system designed for cooling cabinets that requires minimal noise.
Want Better Immersion? Fix Your Side Wall Reflections
Meta description: “Maximize your home theater experience by fixing side wall reflections—discover simple steps to enhance immersion and enjoy better sound quality.