DIY Projector Dolly: Creating Smooth Camera Movements for Home Videos
With a simple DIY projector dolly, you can transform your home videos into cinematic masterpieces—discover how to achieve smooth camera movements today!
Creating a DIY projector dolly is a great way to achieve smooth camera movements for your home videos. Start with a sturdy one-meter base and equip it with longboard wheels to guarantee fluid motion. Experiment with weight distribution to find the right balance for stability. Incorporating nylon screws will reduce friction, enhancing performance. Don't forget to practice your panning and pushing techniques for seamless shifts. With time, you'll elevate your video's production quality, making it more engaging. As you explore dolly assembly and techniques, you'll discover even more tips to enhance your filming skills.
Key Takeaways
Build a sturdy one by one meter base for stability during camera movements and to prevent wobbling.
Use longboard wheels to ensure smooth gliding and minimize friction for fluid camera motion.
Experiment with weight distribution to find the right balance for enhanced stability while filming.
Incorporate a custom pushing bar tailored to your height for better ergonomics and control.
Regularly practice and test your setup to achieve optimal smoothness and refine your filming techniques.
Outdoor-Projector-4K with WiFi and Bluetooth:[3500 Bright/60W Dolby Audio/Official Licensed Apps],Smart-Projector with AI Auto Focus,ONOAYO ONO5Pro 2.0 Movie Projector for Indoor/Outdoor 2026New
[Hear the Difference–Hollywood-Grade Dual 60W Dolby Audio] Why spend more on a TV + soundbar or settle for...
As an affiliate, we earn on qualifying purchases.
Understanding Dolly Techniques
When it comes to mastering dolly techniques, smooth and continuous motion is essential for achieving professional-looking shots. You'll want to practice regularly and pay close attention to how you operate the dolly.
Using paper marks for focus alignment at various points can help maintain sharpness throughout your dolly shots, especially when you're manually focusing. I'd say combining panning and pushing techniques can create dynamic shots that elevate your storytelling, making your videos more engaging.
For shorter shots, pushing from the base of the dolly provides stability, while an upright pushing position allows for better comfort during longer takes.
Experimenting with different weights and wheel types on your DIY dolly can greatly affect the smoothness and quality of your camera movements. Don't hesitate to make adjustments based on your specific needs and the environment you're filming in.
The right combination of these elements can take your dolly work to the next level. Remember, consistency is key, so keep refining your technique until you achieve that fluid motion you're after. With practice, you'll create visuals that truly captivate your audience.
[Built-in Apps/4K Support] Smart Outdoor Projector with WiFi and Bluetooth, Movie Projector, DoIby Audio with Dual Speaker, Auto Focus w/ YouTube&PrimeVideo Proyector, Upgrad P62 Pro
[Upgraded Classic – P62 Pro Movie Projector] Building on the reliability and low return rate of the classic...
As an affiliate, we earn on qualifying purchases.
Mastering Focus While Moving
Mastering focus while in motion is an essential skill that complements your dolly techniques. When you're panning and pushing, manual focusing becomes critical, especially with vintage lenses lacking autofocus. It requires a consistent rhythm and practice to nail those shots.
To enhance your focus accuracy, utilize focus peaking on your monitor. This feature lets you make real-time adjustments, which is imperative during dynamic dolly shots. However, pulling focus while executing a dolly push can be tricky. That's why rehearsing both the movement and focus pull beforehand can considerably improve your results.
Marking multiple focus points on your subject can streamline adjustments, allowing for smoother dolly movements. Here's a quick table to illustrate some effective strategies:
Technique
Description
Manual Focus
Requires practice for accuracy
Focus Peaking
Real-time focus adjustments
Rehearsal
Practice movements and focus pulls
Marking Focus Points
Simplifies focus adjustments
Experimenting with different techniques and setups will lead to satisfactory outcomes, enhancing the quality of your home video production. Remember, practice makes perfect!
【Now with Netflix & 3000ANSI】Smart 4K Projector with WiFi and Bluetooth, VISSPL 3D Dolby Audio and Auto Focus Portable Outdoor Projector, Movie Home Theater Projectors for Bedroom/Ceiling
[ Netflix Ready - No Extra Devices Needed ] – VISSPL Smart Projector: No TV stick, no casting,...
As an affiliate, we earn on qualifying purchases.
Effective Pushing Techniques
When you're pushing the dolly, position yourself at the base for better stability, especially on shorter shots. This technique not only enhances control but also allows you to adjust your weight distribution effectively for smoother movements.
Incorporating elements like proper lighting control and screen placement can further elevate your filming setup, ensuring that your home videos have a professional touch, similar to the quality you'd find in the role of contrast ratio in projector image quality.
Optimal Pushing Position
Achieving ideal pushing position on your DIY projector dolly is essential for smooth and controlled camera movements. Start by pushing from the base of the dolly, as this provides greater stability and control, particularly for short shots. This technique guarantees that your movements are fluid and precise, minimizing any unwanted shakes.
Maintain an upright pushing position to enhance your comfort and improve your ability to manipulate the dolly. Good posture not only helps you push more effectively but also reduces fatigue during longer shoots. Understanding the physics at play—like weight distribution and the center of gravity—can considerably impact your pushing techniques.
Consider creating custom pushing bars tailored to your height and grip style. This small adjustment can lead to a more ergonomic and efficient pushing experience.
Regular practice is key; as you refine your pushing techniques, you'll develop a rhythm that supports consistent, smooth camera movements. The more comfortable you become with your dolly's operation, the more effective your shots will be, allowing you to focus on capturing stunning home videos without the hassle of shaky footage.
Stability Through Weight Adjustment
To enhance stability while using your DIY projector dolly, adjusting the weight distribution is key. Pushing from the base of the dolly gives you greater stability for short shots, minimizing vibrations and making your movements smoother.
When you adopt an upright pushing position, you'll find that it improves both comfort and control, allowing for more precise adjustments during operation.
Experimenting with added weights can greatly affect how your dolly behaves. It's crucial to find that sweet spot for ideal balance, ensuring the smoothest operation possible.
Additionally, consider using nylon nuts in your wheel assembly. They can reduce friction, leading to improved overall performance.
Customizing your pushing bars for ergonomic handling can also make a big difference. With better control and ease of use, especially during longer shooting sessions, you'll capture those perfect moments without the hassle of instability.
Smart 4K Projector [Google TV Stick Built-in & 360° Stand] with WiFi 6, Bluetooth 5.3, HDR10, 30W Hi-Fi, AI Auto Focus, Outdoor Portable Short Throw Movie Projector for Home Theater Bedroom Ceiling
[Google TV Built-in | 10,000+ Apps | Voice Control] The smart projector with wifi and bluetooth features Google...
As an affiliate, we earn on qualifying purchases.
Wheel Mechanics and Weights
The dolly's wheel mechanics play an important role in ensuring smooth and controlled movements during your DIY projector setup. Utilizing nylon nuts in the wheel assembly can greatly enhance movement smoothness, so consider this when building your dolly.
Additionally, the weights you add directly affect how your dolly performs. Testing with various weights is vital to find that ideal balance. For instance, a nine-kilogram weight might create some squeaking, but it's generally manageable, showing how weight impacts overall performance.
Don't forget to experiment with different wheel types, as they can improve the dolly's functionality and ease of movement.
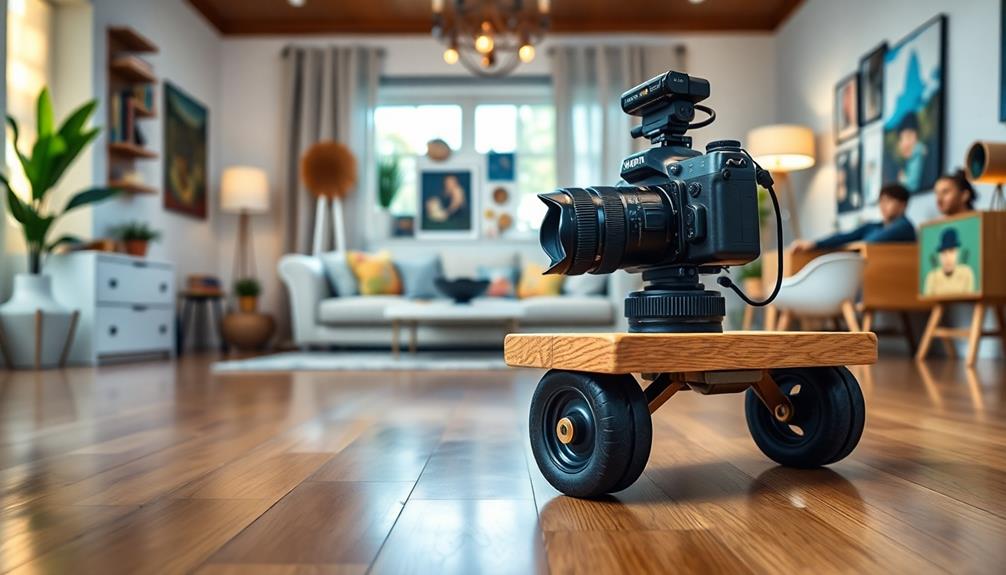
A recommended base size of one by one meter provides a stable foundation, which is critical for achieving those fluid camera movements you're aiming for.
Benefits of Smooth Dolly Shots
When you incorporate smooth dolly shots into your videos, you instantly elevate their production value, giving them a professional and cinematic quality. These techniques enhance your storytelling by allowing for dynamic angles and perspectives that truly engage your viewers. With well-executed dolly shots, you can capture emotions and actions in ways that static shots simply can't achieve.
Consistent practice with dolly techniques like panning and pushing is essential. It helps you master accurate focus and create smooth shifts between shots, keeping your audience immersed in the narrative. The right wheel mechanics, such as nylon nuts and longboard wheels, play a significant role in ensuring fluid motion. They minimize unwanted noise and improve stability, resulting in a polished final product.
Using a stable dolly base, ideally one by one meter, gives you the control needed for versatile camera movements. This allows you to experiment with different shot compositions while maintaining a professional look.
Ultimately, smooth dolly shots not only enhance the visual appeal of your videos but also enrich the overall viewing experience, making your content more memorable and impactful.
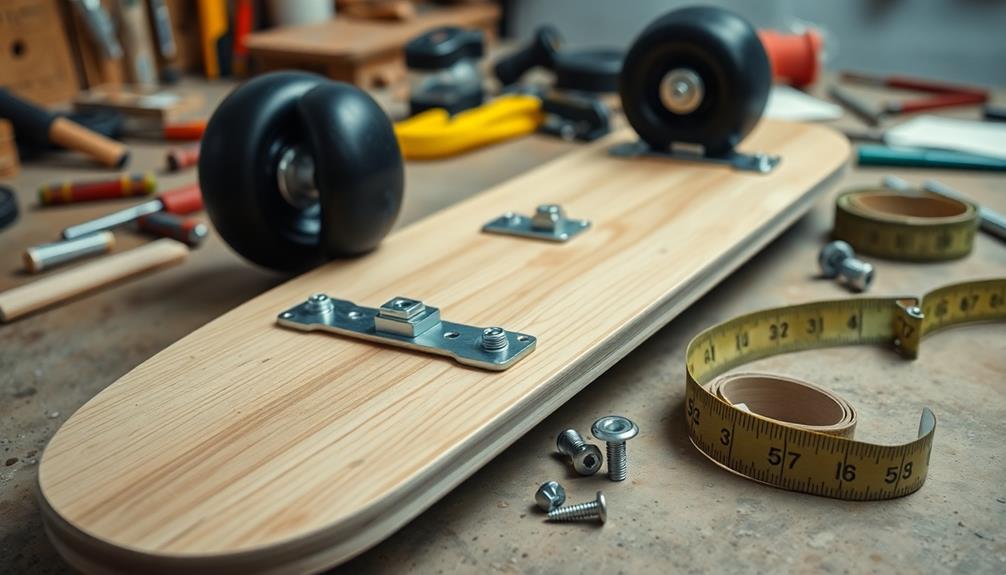
Materials for DIY Dolly Construction
When building your DIY dolly, you'll need to gather essential tools and select the right materials for peak performance.
Consider using longboard wheels for smooth movement and nylon screws to enhance stability.
Additionally, you might want to think about incorporating robot vacuum technology to guarantee your dolly has advanced features that improve navigation.
Let's explore some assembly tips and techniques to make sure your dolly operates seamlessly.
Essential Tools Required
Building a DIY projector dolly requires gathering essential materials to secure your project rolls smoothly. Having the right tools on hand will make your assembly process more efficient and enjoyable. Here's what you'll need:
Sturdy base: Choose plywood or a longboard, about one meter square, for a solid foundation.
Nylon screws and nuts: These are vital for wheel assembly, guaranteeing your dolly moves seamlessly.
Longboard wheels: Opt for high-quality wheels that minimize friction and enhance glide.
Weights: Incorporate around nine kilograms to optimize stability; feel free to experiment with different weights for the best results.
Additional tools: Equip yourself with a drill, screws, and a level to aid in precise assembly and alignment.
Gathering these materials won't only secure your dolly functions effectively but also make your filming experience much more fulfilling.
Imagine gliding your camera smoothly across a scene, capturing every moment perfectly. This isn't just a project; it's a step towards creating stunning home videos you'll cherish for years to come.
Recommended Material Types
Choosing the right materials is key to constructing a reliable DIY projector dolly. For ideal smoothness and durability, you'll want to use nylon screws and longboard wheels. These components guarantee that your dolly moves freely without unnecessary friction.
A sturdy base measuring one by one meter is recommended to provide stability and prevent tipping during operation, which is vital for achieving those smooth camera movements.
When assembling the wheels, incorporating nylon nuts can greatly enhance the dolly's performance. They reduce friction, making your movements even smoother. Don't forget to experiment with different weights; while heavier weights can stabilize the dolly, they might introduce noise, so finding the right balance is essential.
Additionally, consider custom pushing bars that improve ergonomics and control during operation. These bars make it easier for you to execute smooth shots, allowing for better maneuverability.
Assembly Tips and Techniques
Assembling your DIY projector dolly involves a careful approach to ascertain everything fits together seamlessly. Start with a solid base, ideally one by one meter, to guarantee stability during movement.
When choosing wheels, longboard wheels are a fantastic option for enhancing smoothness, allowing your camera to glide effortlessly. Incorporate nylon screws and nuts; they'll help reduce friction and improve the overall dolly operation.
Don't forget to experiment with different weight configurations. Adding weights can stabilize your dolly, but be aware that heavier setups might lead to squeaking.
Also, consider creating custom pushing bars to improve ergonomics and control, making your filming experience more comfortable.
Here's a quick checklist for your assembly:
Longboard wheels for fluid movement
A 1×1 meter sturdy base
Nylon screws and nuts to reduce friction
Different weights for ideal stability
Custom pushing bars for better control
With these tips, you'll find that each element contributes to a smoother, more professional-looking video. Happy building!
Setting Up Your Dolly Base
To guarantee your DIY projector dolly operates smoothly, it's essential to establish a sturdy base. Aim for a size of one by one meter; this will provide enough support and balance during movement. Using nylon screws for assembly is a smart choice, as they minimize friction and enhance the smoothness of your dolly's operation.
Incorporate longboard wheels into your design. These wheels offer better rolling capabilities and stability, ensuring your camera moves fluidly. When setting up your dolly, make sure the base is level and securely mounted. This step is important to prevent any wobbling or instability while shooting, which can compromise the quality of your footage.
Always double-check that everything is tightly secured and that the wheels are functioning properly. A well-constructed base won't only improve your dolly's performance but also enhance your overall filming experience.
Experimenting With Weights
When you're experimenting with weights on your DIY projector dolly, you'll quickly notice how it affects movement smoothness.
Finding the ideal weight can minimize vibrations and enhance your shots, but too much can lead to resistance.
It's all about balancing the load to achieve that perfect glide.
Optimal Weight Selection
Finding the right weight for your DIY projector dolly can make all the difference in your filming experience. Experimenting with various weights is essential for achieving that perfect balance between ease of handling and stability. Lighter weights allow for quick movements, while heavier weights can help keep your shots steady.
Here are a few things to take into account as you test different weights:
Smooth Motion: A well-balanced dolly glides effortlessly, capturing every moment beautifully.
Creative Freedom: Finding the right weight lets you focus on your vision, not on your equipment.
Confidence Boost: Knowing your dolly performs reliably can elevate your filmmaking game.
Quality Results: The right weight choice enhances the overall quality of your home videos.
Personal Satisfaction: Mastering your dolly setup brings a sense of accomplishment and pride.
During tests, a nine-kilogram weight showed some squeaking, yet the movement remained manageable. This indicates that your wheel type, along with the weight, plays a vital role in performance.
Don't hesitate to mix and match weights and wheel types until you discover the ideal setup that best suits your filming needs.
Impact on Movement Smoothness
The weight you choose for your DIY projector dolly directly influences how smoothly your camera moves during filming. Experimenting with different weights can greatly improve stability, leading to smoother shots. For instance, using a nine-kilogram weight can enhance performance, even if it introduces some manageable squeaking.
However, it's essential to take into account the type of wheels you're using, as they can also impact movement smoothness. Pairing the right wheels with your chosen weight can make a noticeable difference, so don't hesitate to test various combinations.
Additionally, using nylon nuts for wheel assembly can further improve smoothness, especially when you achieve the right weight distribution.
Finding that ideal weight for your dolly setup is often a trial-and-error process. You'll need to balance stability and mobility to get the best shot quality.
Practice Makes Perfect
Mastering dolly operation demands consistent practice to guarantee you achieve that smooth, continuous motion vital for high-quality shots.
As you engage in your practice sessions, don't forget the importance of focus alignment. Use paper marks to pinpoint your focal areas, making it easier to hit your targets consistently. Incorporating manual focus techniques while panning and pushing will require a rhythmic approach, which becomes more natural with time and repetition.
Experiment with various pushing techniques, whether pushing from the base for stability or upright for comfort. This exploration helps you discover what feels right for you.
Regularly testing different weights and wheel types also plays an important role in finding your ideal setup.
Here's what you'll gain from putting in the effort:
The thrill of nailing that perfect shot
Confidence in your camera movements
A sense of accomplishment as you improve
The joy of creating visually stunning videos
Enhanced storytelling through fluid motion
Creative Filming Techniques
When you incorporate creative filming techniques with your DIY projector dolly, you can elevate your video projects to new heights. Utilizing smooth, continuous camera movements enhances the visual quality of your home videos, making them more engaging.
Incorporating features like dynamic weather can inspire unique storytelling methods and visual effects. Try combining panning and pushing techniques; these dynamic shots add depth to your storytelling and keep your audience captivated.
While filming, practice manual focus. This is especially important if you're using vintage lenses that lack autofocus support. Sharper images will greatly improve your final product.
Additionally, experiment with different weights on your dolly setup. Starting with nine-kilogram weights can help you fine-tune the smoothness and stability of your shots.
Building your dolly with a one-by-one meter base, using durable materials like nylon screws and longboard wheels, guarantees a smoother operation during filming.
With a sturdy setup, you can focus on perfecting your creative techniques without worrying about the equipment. Don't hesitate to explore various angles and movements, as this experimentation will lead to unique results and enhance your filmmaking skills.
Get ready to impress with your newfound creativity!
Frequently Asked Questions
What Is Basic Camera Movement Dolly?
A basic camera movement dolly's a wheeled platform that helps you achieve smooth, controlled shots. It enhances your video quality by allowing panning and pushing techniques, making your storytelling more dynamic and visually appealing.
How to Do a Tracking Shot at Home?
To do a tracking shot at home, you'll want to use a dolly for smooth movement. Practice pushing techniques, focus alignment, and experiment with weights to find the perfect balance for your shots.
Conclusion
By incorporating a DIY projector dolly into your home videos, you can elevate your filmmaking game considerably. Did you know that smooth camera movements can increase viewer engagement by up to 70%? With practice and a bit of creativity, you'll master the art of dolly shots in no time. So, gather your materials, experiment with weights, and enjoy the process. Before you know it, your videos will have that professional touch you've always wanted!
The Impact of Ambient Light on Projector Performance: Solutions and Tips
Prepare to transform your projector experience as we explore how ambient light affects performance and discover effective solutions to enhance your viewing pleasure.
How to Choose the Right Projector Mount for Your Setup
Knowing the right factors for selecting a projector mount can transform your viewing experience; discover what you need to consider before making a decision.
Creating a Themed Home Cinema: Ideas and Implementation
Join the journey of transforming your space into a stunning themed home cinema, where comfort and creativity converge for an unforgettable movie experience.


![Outdoor-Projector-4K with WiFi and Bluetooth:[3500 Bright/60W Dolby Audio/Official Licensed Apps],Smart-Projector with AI Auto Focus,ONOAYO ONO5Pro 2.0 Movie Projector for Indoor/Outdoor 2026New](https://m.media-amazon.com/images/I/41fylkjOTIL._SL500_.jpg)

![[Built-in Apps/4K Support] Smart Outdoor Projector with WiFi and Bluetooth, Movie Projector, DoIby Audio with Dual Speaker, Auto Focus w/ YouTube&PrimeVideo Proyector, Upgrad P62 Pro](https://m.media-amazon.com/images/I/51yAGv8VI7L._SL500_.jpg)


![Smart 4K Projector [Google TV Stick Built-in & 360° Stand] with WiFi 6, Bluetooth 5.3, HDR10, 30W Hi-Fi, AI Auto Focus, Outdoor Portable Short Throw Movie Projector for Home Theater Bedroom Ceiling](https://m.media-amazon.com/images/I/41zno6cZMFL._SL500_.jpg)


![[Invitation] Galaxy Unpacked July 2026: A New Shape Unfolds](https://1hometheatreprojector.com/wp-content/uploads/2026/07/invitation-galaxy-unpacked-july-2026-a-new-shape-unfolds-featured-260x140.jpg)