If you are interested in making a DIY projector using a mirror, there are some key steps to keep in mind. Initially, you must access the lens housing of your projector, which is a crucial component. Following that, you will need to securely attach a mirror to a piece of cardboard using a hot glue gun at a 45-degree angle in relation to the lens of the projector.
Making a projector with a mirror
You can make a homemade projector by using a mirror and a magnifying glass. You can also use a magnifying glass to trace the lens hole on the side panel. Be sure that the hole is the right size and fits the lens. Once you have the hole right, you can place the lens in the hole. Make sure that the curved part of the lens faces inwards and the flat side faces outwards.
Now, it’s time to assemble your homemade projector. First, open the lens housing. This is the main part of your projector. Next, attach the mirror to the cardboard using a hot glue gun. The mirror should be positioned at a 45-degree angle to the projector lens.
To ensure a high-quality image, you need to darken the inside of your homemade projector. It will prevent light from dispersing and give you a better picture. If you can’t find a magnifying glass, use thick paper to help stabilize your projector. You can also use black paint, but make sure that you let the paint dry completely. Once the inside of your homemade projector is dark, you can cut the shape of the magnifying glass with a precision knife.
Installing a lens
Installing a lens on a homemade video projector is fairly straightforward. You’ll need two boxes, one for the projector and one for the lens. The projector’s lens is the focal point of the device, which allows you to focus on the image. You can make this lens adjustable by moving it around.
The lens is attached to the projector’s frame via a screw or a release lever. When replacing the lens, be sure to carefully remove the old one and then line up the new one with the lens connector. Turn the lens to the right until you hear a clicking sound.
To install the lens, you need a magnifying glass of the right size. A good quality one will allow you to view objects with great detail. The magnifying glass’s quality will also affect the sharpness of the image you project. To make the lens more stable, use a black piece of paper.
Using a shoe box
To make a shoe box projector, you will need a shoe box, a mirror, and a lens. You will need a hole to install the lens into and a hole to insert the shoe box through. You can also use a magnifying glass to measure the size of the hole. Once you have the hole in the shoe box, insert the lens into the hole, ensuring that the curved part is facing inwards and the flat part facing outwards. Once the projector is made, you can watch movies or watch a video on it. You can adjust the lens to make sure that the image is clear.
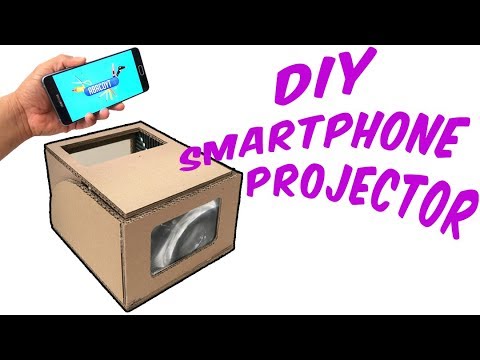
You can also use the homemade projector to watch videos on your smartphone. It is simple to construct and is used by many elementary school children around the world. First, you will need to find a dark shoebox and then mount a magnifying glass to the inside. Then, you can place a smartphone or other device inside the shoe box. You will then be able to watch movies or other video clips with ease. To get the most out of this homemade projector, you can try moving the projector closer or farther away from the wall to get a clear image.
Using a light bulb
First of all, you need a piece of wood for the base of the lens. You can use a 3” x 3” wood block or a Popsicle stick. The hole should fit the lens perfectly. Next, remove the lens from the magnifying glass and install it into the hole. It should have a curved part facing inwards and a flat surface facing out.
To make a slide projector, use the same technique as that of the light bulb projector. Place a cylindrical cap over the light bulb and cut a rectangular hole in the flat bottom of the cap. This hole should be slightly larger than the focal length of the film or slide. The inner tube can then be adjusted so that the projected image can be clearly seen a few feet away from the light bulb. Alternatively, you can also use a 20” x 3” wooden block for the projector’s base.
You can also try this technique with your smartphone. It works great for movies and TV shows because it lets you see what is on the screen without distortion. The only drawback is that you have to make sure that you use a quality lens. The projector is also a great way to save money and still enjoy your favorite show at home.